Showing posts with label Ideas How to. Show all posts

How To Safely Hide AdSense Ads using "Display:none"

How To Safely Hide AdSense Ads using "Display:none" ?


hide Adsense ads using "display none"

In this tutorial we will share how you can set a parameter with CSS media queries for smaller mobile devices so that no ad request is made and no ad is shown. We have applied it on our blog and have set ads not to display on small screens.

Isn't it illegal To Hide AdSense Ads?

Yes it is but only for synchronous ads but not for asynchronous which is the new code AdSense creates to render responsive ads on your blogger blog or website.
The official support site of Google says that it allows publishers to modify the Ad by hiding it using CSS3 Media queries for responsive Ad units (asynchronous) only but it disallows it for synchronous ads. Here is the block quote for verification:

AdSense new policy allows publishers to only hide Responsive Ads using CSS media queries. You can choose to control the display of your Ad visibility on different mobile devices. You can now choose when to show or hide an ad unit. All these is now possible thanks to the Responsive Ad units. We recently shared a tutorial on how to create responsive ad spots and how to stop AdSense from serving blank space on Responsive ad units by fixing the blank space error. Today we will take a step ahead and share the trick of hiding AdSense Ads  on any screen size you want using simply CSS "Display:none" property.  Note that Google only allows you to hide the content using the CSS property of display and it does not yet allow using "visibility:hidden" property so we will only follow techniques which goes in accordance with AdSense Program policies. Sites which are hiding the AD code using "visibility hidden" are surely not following recommended methods and pose a serious thread to your accounts so always follow authentic methods to manage your monetization strategies.

Techniques to avoid

Here are some techniques you’ll want to avoid:
  • Hiding ad units at anytime (e.g., display:none), unless you're implementing a responsive ad unit.
  • Implementing AdSense ad code in a way that covers content
  • Using any means to force the display of more than three AdSense ad units on a page
  • Manipulating the ad targeting using hidden keywords, IFRAMEs, or any other method
  • Distributing ads in emails or software
  • Floating ads or units that slide to attract unwarranted attention

Hide AdSense Responsive ADs

I assume that you have read our tutorial on creating responsive ad units, if not kindly read it first
Must Read: Fix AdSense Responsive Ad units Showing a Blank Space
You just need to make a slight modification to the CSS code of your ad code and mention on which Screen Size would you like to hide displaying ads. All code is same that we shared earlier except the yellow highlighted section
<style type="text/css">
.adslot_1 { max-width: 300px; height: auto; margin:10px 0px; }
@media (max-width:99px) { .adslot_1 { display:none; } }
@media (min-width:100px) { .adslot_1 { width:125px; height:125px; } }
@media (min-width:180px) { .adslot_1 { width:180px; height:150px; } }
@media (min-width:200px) { .adslot_1 { width:200px; height:200px; } }
@media (min-width:250px) { .adslot_1 { width:250px; height:250px; } }
@media (min-width:300px) { .adslot_1 { width:300px; height:600px; } }
@media (min-width:336px) { .adslot_1 { width:336px; height:280px; } }
@media (min-width:468px) { .adslot_1 { width:468px; height:60px; } }
@media (min-width:728px) { .adslot_1 { width:728px; height:90px; } }
</style>
<script async src="//pagead2.googlesyndication.com/pagead/js/adsbygoogle.js"></script>
<ins class="adsbygoogle adslot_1"
     style="display:inline-block;"
     data-ad-client="xxxxxxx"
     data-ad-slot="xxxxxx"></ins>
<script>
(adsbygoogle = window.adsbygoogle || []).push({});
</script>

The above code has no changes except the yellow highlighted section where I have set ads not to display for screen sizes less than 99px. For sizes greater than 99px, ads will display normally. I have chosen 99px because normally all smart phones today have a wider screen size and day by day screen sizes are getting bigger except for some old sets which have an extremely small size and it makes no sense displaying ads on smaller screen sizes.
Hiding them will block the ad from rendering and loading. The JavaScript will not load this time unlike in synchronous where the JS still loads despite setting display:none. This is one extra benefit of using async codes. So you are not actually setting Ads to not show or disappear you are actually telling AdSense not to load Ads for a specific screen size.
You can also set a custom width to hide ads on a specific screen size. Suppose you wish to Hide ADs on a screen size between 250px but wish to display it for other screen sizes  so you will edit the code as shown below
PS: I am just sharing the CSS code here for simplicity:
<style type="text/css">
.adslot_1 { max-width: 300px; height: auto; margin:10px 0px; }
@media (min-width:100px) { .adslot_1 { width:125px; height:125px;display:block; } }
@media (min-width:180px) { .adslot_1 { width:180px; height:150px;display:block; } }
@media (min-width:200px) { .adslot_1 { width:200px; height:200px;display:block; } }
@media (max-width:250px) { .adslot_1 { display:none; } }
@media (min-width:300px) { .adslot_1 { width:300px; height:600px; } }
@media (min-width:336px) { .adslot_1 { width:336px; height:280px; } }
@media (min-width:468px) { .adslot_1 { width:468px; height:60px; } }
@media (min-width:728px) { .adslot_1 { width:728px; height:90px; } }
</style>
The code above will hide ads for a screen size 250px or less than 250px but will show ads for 200px, 180px and 100px or for screen sizes greater than 250px.
Note that we are using max-width to hide ads and not min-width condition. This is important because Ads are hidden and no AD request is made only when you use the max-widthcondition.


Google has suggested itself the technique of using display:none on one of its support page
If you want to only show ads for certain screen sizes you can use CSS to accomplish this. The following example shows you how to modify your ad code to use CSS3 media queries to hide ads for specific screen sizes..
Now when we have learnt that the method of using CSS display:none is completely Safe, allowed and legal, we can then proceed towards our tutorial.

That's it!

Create Short code For Responsive HTML

Create Short code For Responsive HTML Tables!


HTML Table ShortcodeAn HTML Table is the most important part of a webpage design that helps you organize content in rows and columns. If you have large HTML Tables then they can barely fit in small Mobile screens and if you try to squeeze it up, the tables either crash or becomes unreadable. Today we will help you create dynamic and Fancy Mobile Responsive HTML Tables using Shortcodes that are naturally fluid and responsive by nature. Instead of squeezing the Table we will let your mobile readers to horizontally scroll Table data using their Thumbs. Responsive Tables are touch sensitive and they can be scrolled to left or right, thus making your content both viewable and readable. All these thanks to Blogger Short code Plugin that helps you create amazing design tools with a simple one line code!


You will be able to insert HTML Tables inside your Blog Posts, widgets and guess what? You can even add Tables inside your blogger comments!
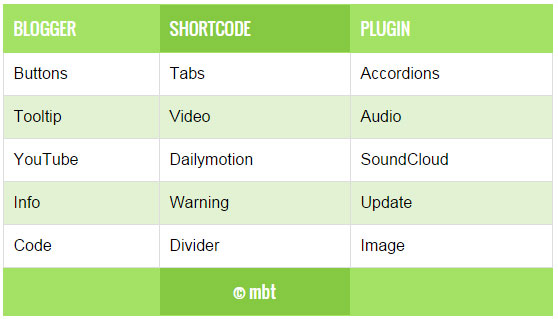
DEMO


Finally Create HTML Table Shortcode

HTML Table Layout
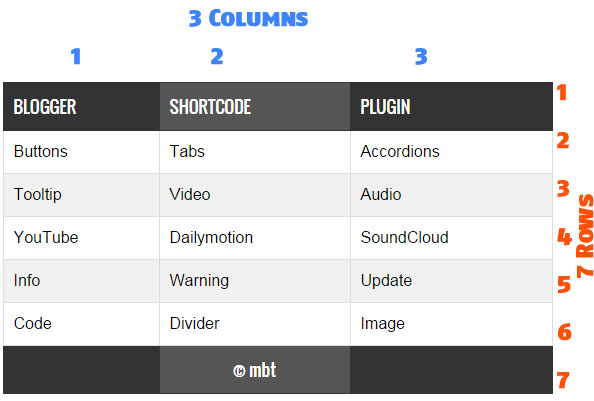
  • The above image shows a Responsive Table with 7 Rows and 3 Columns.
  • Where each row contains three columns.
  • Columns are vertical and Rows are horizontal.
Headings are created using the following shortcode
[heading]Title[/heading]
Data inside table cells is inserted using the following shortcode
[col]Cell[/col]
FULL CODE
Now when you wish to add a Table inside your blog post, you will add the full shortcode in this format.
[table color="theme3"] 
[row] [heading]Title 1[/heading] [heading]Title 2[/heading] [/row] 
[row] [col]Cell 1[/col] [col]Cell 2[/col] [/row]
[/table]   
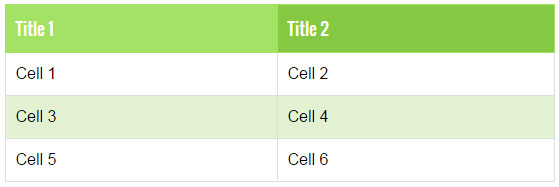
The above Shortcode will create a Green (theme3) Table with 2 rows and 2 columns as shown below
2 rows 2 columns
  • To choose a different theme color simply replace theme3 with theme4 or theme2
  • The default theme is theme1 for which you can use simply [table], no need to mention color attribute.
To Create a Table with  4 Rows and 2 columns you will use the shortcode in this format
[table color="theme3"]
[row] [heading]Title 1[/heading] [heading]Title 2[/heading] [/row]
[row] [col]Cell 1[/col] [col]Cell 2[/col] [/row]
[row] [col]Cell 3[/col] [col]Cell 4[/col] [/row]
[row] [col]Cell 5[/col] [col]Cell 6[/col] [/row]
[/table]
4 rows 2 columns
Lets Create a table with 4 Rows and 3 columns. 
[table color="theme3"] 
[row] [heading]Title 1[/heading] [heading]Title 2[/heading] [heading]Title 3[/heading] [/row] 
[row] [col]Cell 1[/col] [col]Cell 2[/col] [col]Cell 3[/col] [/row] 
[row] [col]Cell 4[/col] [col]Cell 5[/col] [col]Cell 6[/col] [/row]
[row] [col]Cell 7[/col] [col]Cell 8[/col] [col]Cell 9[/col] [/row]
[/table]
4 rows 3 columns
Wasn't that easy? You just need to keep care of the pattern in which you organize the cells. The table will take the shape of the pattern you create using the shortcode. You can insert images, text, lists, videos, other shortcodes and almost any HTML you want!. Sky is the limit with Table Shortcode =)
List of Blogger Shortcodes

What is HTML Table Shortcode?

The table shortcode is a simple textual shortcut code that lets you create fancy Tables without using complex HTML. You can create tables directly from your Blogger Editor composer without needing to switch to the HTML mode.
You all know that a table consists of three important elements which are:

ElementDefinition
RowIn HTML syntax we call it the <tr> tag but in our Shortcode we renamed it as[row]
ColumnIn HTML DOM it is known as <td> which is the data container or data cell. You can insert text, images, lists, other tables or shortcodes here etc. In our shortcode we simplified it to [col]
HeadingThis tag is written as <th> In our shortcode you will call it [heading] which sounds much more readable.

Instead of using a complex ugly HTML code to design a table you can use a human readable shortcode that does wonders. Our Shortcode is not platform dependent. You can use it anywhere you like, may it be Wordpress, Joomla, Drupal, Blogger or a simple Static HTML webpage. It works great everywhere.

For The Record

So far this is the first Shortcode for HTML tables that does not uses the complex method of passing data as a long sequential array.  Instead you will construct the layout for your HTML Table using rows and columns to clearly organize data. Lets create one instantly!

1. Install Blogger Shortcode Plugin

In order to use Table shortcode you must first install the shortcode plugin for your blogspot blog by following 7 easy steps shared in the link below:
  • Read: Blogger Shortcode Plugin Installation Steps
Skip installing it if you have already added it in your blogger template

2. Add Color Themes

We have created 4 Color Themes.
  1. theme1 - Default Black
  2. theme2 - Blue
  3. theme3 - Green
  4. theme4 - Red
Add them to your templates by following these steps:

1 Go To Blogger > Template > Backup your Template

2 Click "Edit HTML"

3 Search for this code ]]></b:skin>

4 Paste the following Code just above it

/*----------HTML Table Shortcode--------*/
#theme1, #theme2,#theme3,#theme4{width:100%;font-family:sans-serif,arial; block;border-spacing: 0;}
#theme1, #theme2,#theme3,#theme4,#theme1 th, #theme2 th,#theme3 th,#theme4 th,#theme1 td, #theme2 td,#theme3 td,#theme4 td{border:1px solid #ddd;border-collapse:collapse}
#theme1 td, #theme2 td,#theme3 td,#theme4 td{padding:10px}
#theme1 th, #theme2 th,#theme3 th,#theme4 th{padding:12px 10px;text-align:left;font-family:oswald;font-weight:400; font-size: 17px;}
#theme1 tr:nth-child(odd){background-color:#f1f1f1}
#theme1 tr:nth-child(even),#theme2 tr:nth-child(even),#theme3 tr:nth-child(even),#theme4 tr:nth-child(even){background-color:#fff}
#theme1 th{background-color:#333;color:#fff;border:1px solid #333}
#theme1 th:nth-child(even){background-color:#555}
/*Blue*/
#theme2 tr:nth-child(odd){background-color:#d3ecf2}
#theme2 th{background-color:#42b0c9;color:#fff;border:1px solid #42b0c9}
#theme2 th:nth-child(even){background-color:#4bbad3}
/*Green*/
#theme3 tr:nth-child(odd){background-color:#e2f2d3}
#theme3 th{background-color:#a3e264;color:#fff;border:1px solid #a3e264}
#theme3 th:nth-child(even){background-color:#85c942}
/*Red*/
#theme4 tr:nth-child(odd){background-color:#efddda;}
#theme4 th{background-color:#ef4832;color:#fff;border:1px solid #ef4832}
#theme4 th:nth-child(even){background-color:#de1f05}
@media only screen and (max-width:768px) {#theme1,#theme2,#theme3,#theme4 {overflow-x: auto;display: block;}}

5 Save your template and all done!

Show The missing Tag on Blogger Homepage

Show The missing <h1> Tag on Blogger Homepage Title 


Missing h1 Tag

Default Blogger hierarchy for Headline Titles

By default blogger assigns Heading tags in this order which is wrong:
Note: Index Page is your homepage or Label/Search.
Condition#1: When no Image is used as logo but instead title and Description is shown.
Blog Title written in Textual form
Heading TagAssigned to
h1Assigned to Blog Title.
h2Assigned to Post Titles, headings within post body and also Sidebar Titles.

How can your posts rank well when Blogger is assigning the same Headline tag to your sidebar titles which it assigns to your Posts?
Condition#2: When Image is used as logo in Header
Blog Title Replaced with a Logo Image
Heading TagAssigned to
h1Missing: Assigned to none, removed!
h2Assigned to Post Titles, headings within post body  and also Sidebar Titles.
In this case Blogger will remove H1 tag from your blog title and leaving your entire blog deprived of H1 tag. This is the reason when you get errors while auditing your sites.

Custom Optimized Hierarchy For Titles

Following is the SEO friendly and recommend way to display headlines in a Blog. Same method is followed on our Wordpress blogs and MBT also.
Condition#1: When no Image is used as logo but instead title and Description is shown.
Heading TagAssigned to
h1Assigned To Blog Title only on Index Pages and archives and assigned toPost Title on the Item Page. In Item Pages, The Blog Title will have H2 Tag and instead that H1 tag will be assigned to Post Title. This way every page on your blog will have a H1 tag assigned to your most important Title.
h2Assigned to Post Titles on Index Pages and archive. Assigned to Sidebar Titles on all pages. 

Condition#2: When Image is used as logo in Header
Heading TagAssigned to
h1Assigned To Blog Title Logo only on Index Pages and archive page and assigned to Post Title on the Item Page. One H1 Tag will be seen on each page.
h2Assigned to Post Titles on Index Pages and archive. Assigned to Sidebar Titles on all pages.
This simple fix will make your blogs much more optimized and will also help search robots to better understand your Headline significance in terms of organized hierarchy. Lets start making the changes.

Optimizing Heading Tags in Blogger

We have divided this tutorial in two parts. In Part one will fix the Blog Title Tag issue and in Part Two we will optimize the Post Titles.
Part 2: How To Correctly assign H1 and H2 Tag To Post Titles in Blogger?
Almost 90% of Blogger blogs that run a SEO test using some online tool gets an error that the homepage does not contain h1 heading Tag which is mandatory for all pages. All pages must contain the primary title inside this tag and all subsequent titles must follow by h2, h3 and so on. There must be a single h1 tag per page for better SEO results. Blogger removes the h1 tag from the Header title when you replace the Title and description with a Logo. In this tutorial we will teach you how to enclose your Blogspot Logo Image and Text inside h1 tag and we would also assign the Schema micro data tags. Your blog will now show H1 only on your homepage and Search/Label pages which are called index pages but it won't show H1 on item pageswhich include your blog Posts. Inside your Posts only Post title can be granted a H1 tag to give it precedence and priority over all other Headline titles.


Note: This is the first tutorial across the web which is highlighting this issue and proposing a solution to the mystery of a missing H1 Headline Tag in blogger.

I will publish Part 2 on coming Friday.

Customize the Header Tags

Since we have added H1 and H2 tags to the Blog Title, therefore you may now add some styles to them so that your Blog title may not look ugly. Since the CSS classes may differ for custom templates and blogger official templates. Therefore I am sharing below the technique for Blogger Template designer templates only. Though you can ask me for correct classes of your custom templates by leaving a comment below.
For Condition#1 Make these changes
Find this CSS class
.Header h1 {
Replace it with this
.Header h1, .Header h2 {
Next find this
.Header h1 a {
Replace it with this
.Header h1 a,.Header h2 a {
For Condition#2 Make these changes
Add the following CSS class just above ]]></b:skin>
.header h1 a,.header h2 a, .header h1 a:visited, .header h2 a:visited{color:#fff; font-size:10px;text-decoration:none;margin:0;padding:0}
.header h1 span, .header h2 span{text-indent:-999em; display:block;}


Part 1: Optimize Header Blog Title Tag

1 Go To Blogger > Template > Backup your template
2 Click "Edit HTML"
3 Search this code
<div id='header'>
Replace it with this code
<div id='header' itemscope='itemscope' itemtype='http://schema.org/Organization'>
If you could not find <div id='header'> then instead find this code <header> and replace it with this
<header itemscope='itemscope' itemtype='http://schema.org/Organization'>
4 Next search for this code <!--Show the image only-->
Just below it you will find the following HTML code
<a expr:href='data:blog.homepageUrl' style='display: block'>
          <img expr:alt='data:title' expr:height='data:height' expr:id='data:widget.instanceId + &quot;_headerimg&quot;' expr:src='data:sourceUrl' expr:width='data:width' style='display: block'/>
        </a>
Replace it with this optimized Code
<!--Header Tags Optimized Code by MBT-->
<b:if cond='data:blog.pageType == &quot;index&quot;'>
                          <h1 itemprop='name'><a expr:href='data:blog.homepageUrl' itemprop='url' style='display: block'>
                            <img expr:alt='data:title' expr:height='data:height' expr:id='data:widget.instanceId + &quot;_headerimg&quot;' expr:src='data:sourceUrl' expr:width='data:width' itemprop='logo' style='display: block'/><span>My Blogger Tricks</span></a>
                            </h1>
<b:elseif cond='data:blog.pageType == &quot;archive&quot;'/>
<h1 itemprop='name'><a expr:href='data:blog.homepageUrl' itemprop='url' style='display: block'>
<img expr:alt='data:title' expr:height='data:height' expr:id='data:widget.instanceId + &quot;_headerimg&quot;' expr:src='data:sourceUrl' expr:width='data:width' itemprop='logo' style='display: block'/><span>My Blogger Tricks</span></a>
</h1>


<b:else/>
                                   <h2 itemprop='name'><a expr:href='data:blog.homepageUrl' style='display: block'>
                            <img itemprop='logo' expr:alt='data:title' expr:height='data:height' expr:id='data:widget.instanceId + &quot;_headerimg&quot;' expr:src='data:sourceUrl' expr:width='data:width' style='display: block'/><span>My Blogger Tricks</span></a></h2>            </b:if>
  • In the code above replace My Blogger Tricks with your Blog title
5 Finally search for this code <!--No header image -->
Below it you will find the following code:
<div class='titlewrapper'>
                          <h1 class='title'>
                            <b:include name='title'/>
                          </h1>
                        </div>
Replace it with this optimized code:
<!--Header Tags Optimized Code by MBT-->
<div class='titlewrapper'>
<b:if cond='data:blog.pageType == &quot;index&quot;'>
                          <h1 class='title'>
                            <b:include name='title'/>
                          </h1>
<b:elseif cond='data:blog.pageType == &quot;archive&quot;'/>
<b:if cond='data:blog.pageType == &quot;index&quot;'>
<h1 class='title'>
<b:include name='title'/>
</h1>


<b:else/>
  <h2 class='title'> <b:include name='title'/></h2>
</b:if>
                        </div>
6 Save your template and you are all done!

That simple!

How to Make Money With Steam This Holiday Season!

Make Money With Steam This Holiday Season!

Make money on Steam
Winter is usually the most anticipated time for serious PC gamers, because the holidays mean one thing and one thing alone - gamer sales! Steam and EA's Origin, the two most popular digital game distribution platforms, have already kicked off their Christmas sales, and for gamers, this is nothing short of a spring vacation. However, for the business-minded, it is more than just a sale - it's an opportunity to make a few bucks easily.

Steam trading cards

To make any money from Steam, you need to familiarize yourself with the concept of Steam trading cards. These are cards you can trade, or sell on the Steam market. There are two basic types of cards, game cards and holiday/sale cards.

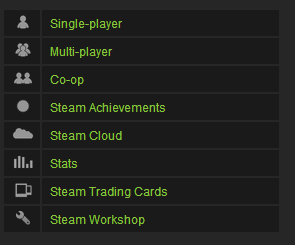
Each game on Steam has its own set of trading cards, provided that it is fully integrated with Steam and supports trading cards. To check if a game supports trading cards, visit its store page, and look for its Steam compatibility in the right sidebar.

Steam compatibility

Additionally, you can see a list of all games owned by you that support trading cards by going to the badges page under your profile.

Another type of trading card is the holiday/sale card. Steam runs a sale on holidays and special occasions all round the year, and the most common of these sales are the Summer and the Winter sales. Right now, the Winter/Christmas sale is underway.

Badges and Booster packs

Getting all the cards drops available for a game makes you eligible for a booster pack. You don't need to complete a collection for it. Once you complete a collection, you can craft a badge. So what are these badges and booster packs?

A booster pack contains 3 random cards, which might include a foil card (more valuable). Booster packs are awarded rarely, but randomly, provided that you are eligible (i.e. have gotten all card drops for a game). You don't have to play a game to win a booster pack - you just need to log into Steam at least once a week.

If you have purchased a game, but have not gotten all the card drops, then I'd suggest you do it as soon as possible. The more booster packs you're eligible for, the higher your chances of being awarded one.

When you complete a collection, you can use it to craft a badge. Badges give you experience for leveling up on Steam (which is also important), along with a chat emote, a background, and sometimes a voucher.

Steam has introduced a new concept this time around. You can use your cards to make Gems. Gems can be used to buy booster packs.

This only applies to games that you purchased. For Free to Play games such as Team Fortress 2 or DOTA 2, you have to make purchases in-game to earn card drops.

There are two types of game cards - normal and Foil. Foil cards are rare, and hence more valuable. So keep a special eye out for them.

You can get holiday/sale cards while making game purchases during a major sale (Summer or Winter etc). Every $10 spent on a sale will get you a card. If that seems excessive, you can get a card by participating in the community voting. Every few votes in the 'Community Choice' deal get you a card. You can vote once in 8 hours during a sale, which usually lasts 10-15 days, giving you plenty of time to make a collection.

How to get trading cards?

There are quite a few ways to get a card. Game cards are dropped randomly while you play a game. Each game has a collection of cards, but you don't get the whole collection this way. You only get roughly half of the collection for free. For a game with 10 cards, you might be allowed a maximum of 5 card drops. You can see how many card drops are left for each game under the Badges section in your profile.

Here's a trick: If you don't have time to spend on playing a game, you can keep the game minimized while you do your work - the cards will still drop!


You can also get cards by buying them from the Steam market, or trading them from your friends.

So, how to make money off all this?

I know all this might be confusing for beginners, but you'll soon get the hang of it once you familiarize yourself with Steam. Making money from steam is simple. You can sell all cards, badges, and booster packs for money on the Steam market. Now here's where it gets a little.....mathy.

Normal trading cards are very cheap, unless the game is new. They'll usually fetch you less than a dollar. Sometimes, only a few cents. A card's price rises and falls over time, like a stock market. It all depends on the supply and demand. You can search for a card in the market and look at its price history to get an estimate on what the card is worth.

Here's a look at the price history for one of the Holiday cards this winter.


Foil cards are rare, but they usually go for a lot more money - sometimes up to 10 times as much as normal cards. Just like normal and foil cards, there are normal and foil badges. But it's often not worth crating a foil badge. You'll make more money by simply selling the foil cards.

Now Booster packs go for a lot of money as well. Once you're rewarded with a Booster Pack, you can either open it or sell it. If you sell it, you'll get some decent money. But if you open it, and find a foil card in there along with other cards, you'll get even more money! But be advised that foil cards in booster packs are rare, so choose what you want wisely.

Sell games

Selling cards probably won't make you rich, but can give you a small and steady income. You can use that money to buy games for friends, who can then pay you in person. You cannot cash out the money you have in your Steam wallet.

Or here's another idea. During the sale, you can buy games at a much discounted rate. You can then sell those games for more money (but less than the official price) once the sale is over. A lot of people buy games outside of sales, so you can hit communities and connect with people to find interested buyers. You can even earn hundreds of dollars if you're willing to invest!

Considering that the Winter sale is currently going on, I say why not take these theories and put them to the test? I've already got a game minimized as I write this, hoping to get some card drops. And I'll be buying some more games from the great Winter deals as well. It's a great time to be gaming this time of the year - you can get some money off it!


Tricks For Blogger © 2015 - Designed by MT MART , Plugins By Best Blogger Trick